
Articles & Updates
Check back here for updates and new articles from time to time. Looking for examples of my work? Hop on over to one of my portfolio pages:

COVID-19 Policy Updates
I’m operating within the COVID-19 Protection Framework (traffic light system). I'll be keeping a record of each location that I visit for photo and video shoots and ensuring that face coverings are worn where required. If you’ve got any questions or concerns about your shoot just get in touch and I’ll be happy to help!
Monday 29 November
I’m operating within the COVID-19 Protection Framework (traffic light system). I'll be keeping a record of each location that I visit for photo and video shoots and ensuring that face coverings are worn where required. If you’ve got any questions or concerns about your shoot just get in touch and I’ll be happy to help!
Monday 18 May
Following NZ’s return to alert level 2, I’m now able to provide a variety of photo and video shoots. I’ll be working in accordance with the Government’s guidelines on health and safety, as well as NZIPP’s guidelines for photographers operating during level 2.
For bookings, please fill out my contact form or flick me an email at sam@sampfordcathie.com and I’ll be happy to tee up a time and plan for your shoot!
Cheers,
Sam
Tuesday 28 April
With the recent change to alter level 3, I’m now able to provide zero-contact photoshoots and video shoots.
Starting from today, if you have a residential, retail or commercial project that’s available to be photographed, and that site is currently vacant or closed to the public, please book a shoot by using my contact form or by emailing sam@sampfordcathie.com and I’ll be happy to tee up a suitable time and action plan for your shoot.
If your project is residential and is currently occupied, please be aware that I will not be able to conduct a shoot until the alert level is lowered.
Once the alert threshold has been shifted to level 2, I’ll be available for all photo and video shoot bookings.
Cheers,
Sam
Monday 23 March
Following the government’s recent escalation of the COVID-19 alert level to level 4, I'll unfortunately no longer be available to shoot for the next four weeks while NZ is in self-isolation.
I'll still be working from home during this time, and am more than happy to assist with any remote requests, including video editing and image retouching.
During this time you can reach me via email at sam@sampfordcathie.com
Cheers,
Sam
Monday 16 March
The safety and wellbeing of my clients and my team is my top priority. Here’s how our process is changing in response to Coronavirus (COVID-19).
Keeping our distance
As of mid-March, my second-shooter Charlotte and I are independently working from home and taking precautions to minimise the risk of exposure to the virus. This includes -
Following the government’s guidelines for hand-washing and cleaning
Keeping hand sanitiser available on all shoots
Avoiding touching any surfaces or objects when shooting on-location where possible
Avoiding physical greetings, including handshakes
We’re also adhering to recommendations outlined by the NZIPP for photographers operating in NZ - including:
Taking minimal gear to sessions where possible
Defering sessions if any team member of client feels unwell
Cleaning surfaces regularly
Deferring shoots for 14 days if a client has been overseas, or in contact with someone who has been overseas.
For Architecture & Interior Shoots
Thankfully, the majority of our work is low-contact and involved only a handful of personnel.
To help avoid contact, we recommend that (where possible) clients meet us at the shoot location to let us in, and then distance themselves from us during the shoot.
We’re also happy to pick up & drop off keys for access, or if you have a door with a keycode, consider setting us a temporary entry code for the shoot date, so that you don’t need to be there.
For Video Shoots
We’ll again be keeping physical contact to a minimum and avoiding crowded areas.
If you or anyone involved in an upcoming shoot are unwell or have recently been overseas, please let us know.
Whilst the situation is evolving constantly, we will continue to review these processes. At this stage we will continue to offer bookings for our clients.
If you have any questions or hesitations about your shoot please get in touch to discuss these. Again; everyone’s health, safety and wellbeing are our highest priority.
I’ll also be monitoring the Ministry of Health guidelines for updates - available here
Stay safe out there!
Cheers,
Sam

Winning Images from the 14th Annual Black and White Spider Awards
I was thrilled to receive two honourable mentions and two nominations in the 14th Annual Black and White Spider Awards at the PhotoShow streamed Saturday, October 12, 2019. Two of my images, titled Zazen and Sentinel received honourable mentions in the Architecture category.
I was thrilled to receive two honourable mentions and two nominations in the 14th Annual Black and White Spider Awards at the PhotoShow streamed Saturday, October 12, 2019.
Two of my images, titled Zazen and Sentinel received honourable mentions in the Architecture category:

Zazen, D.T. Suzuki Museum, Kanazawa

Sentinel, Bean Rock Lighthouse, Waitemata Harbour
The live online gala was attended by industry leaders and the photography community from around the globe. 14th Annual Jury members included captains of the industry from Musee de l'Elysee, Lausanne; The Guardian, London; Contrasto Galleria, Milan; Travel/Discovery Channel, New York; Harper's Bazaar, UK; Portuguese Center of Photography, Porto; Aeroplastics Contemporary, Brussels; Silvan Faessler Fine Art, Zurich; ADK Creative One Inc., Tokyo; Galerie Hubert Winter, Vienna; Conny Dietzschold Galleries, Sydney; and Pereira O'Dell in New York who honored Spider Fellows with 758 coveted title awards and 909 nominees in 32 categories.
Two additional images of mine, titled Forum and Waiting, were nominees in the Architecture and People categories respectively.

Forum, Tokyo International Forum - Exterior

Waiting - Anna, Parnell Cathedral
"It's an incredible achievement to be selected among the best from the 6,418 entries we received this year" said Basil O'Brien, the awards Creative Director.
BLACK AND WHITE SPIDER AWARDS is the leading international award honoring excellence in black and white photography. This celebrated event shines a spotlight on the best professional and amateur photographers worldwide and honors the finest images with the highest achievements in black and white photography.

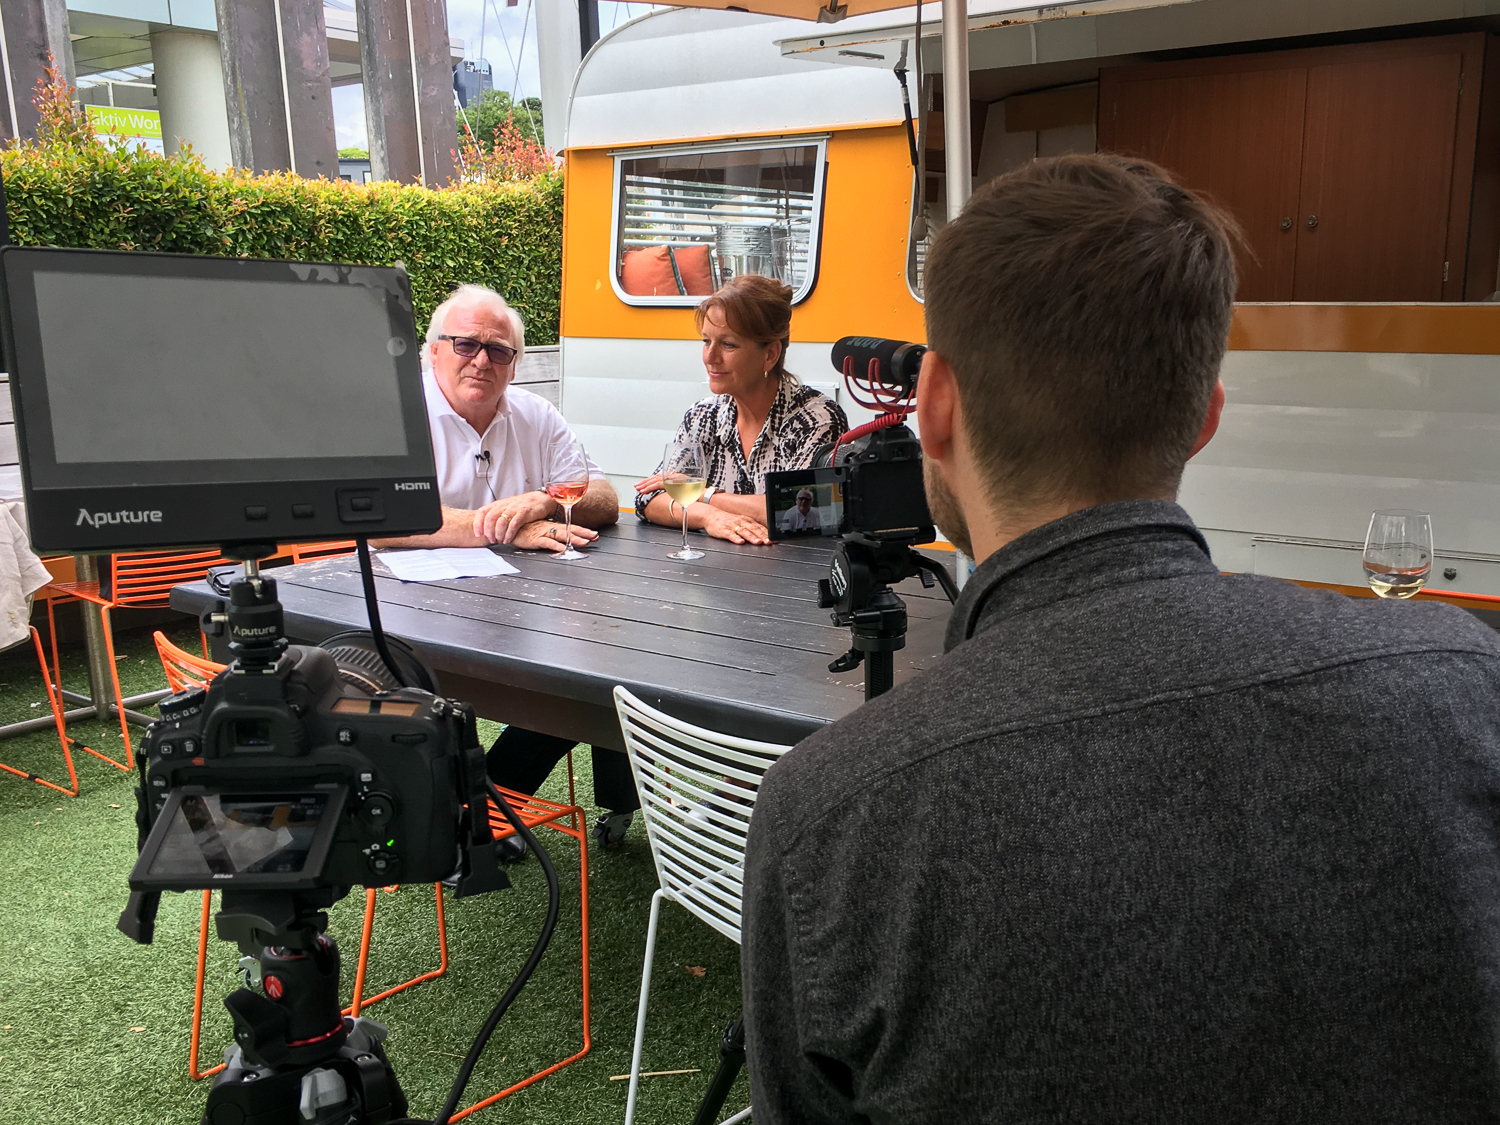
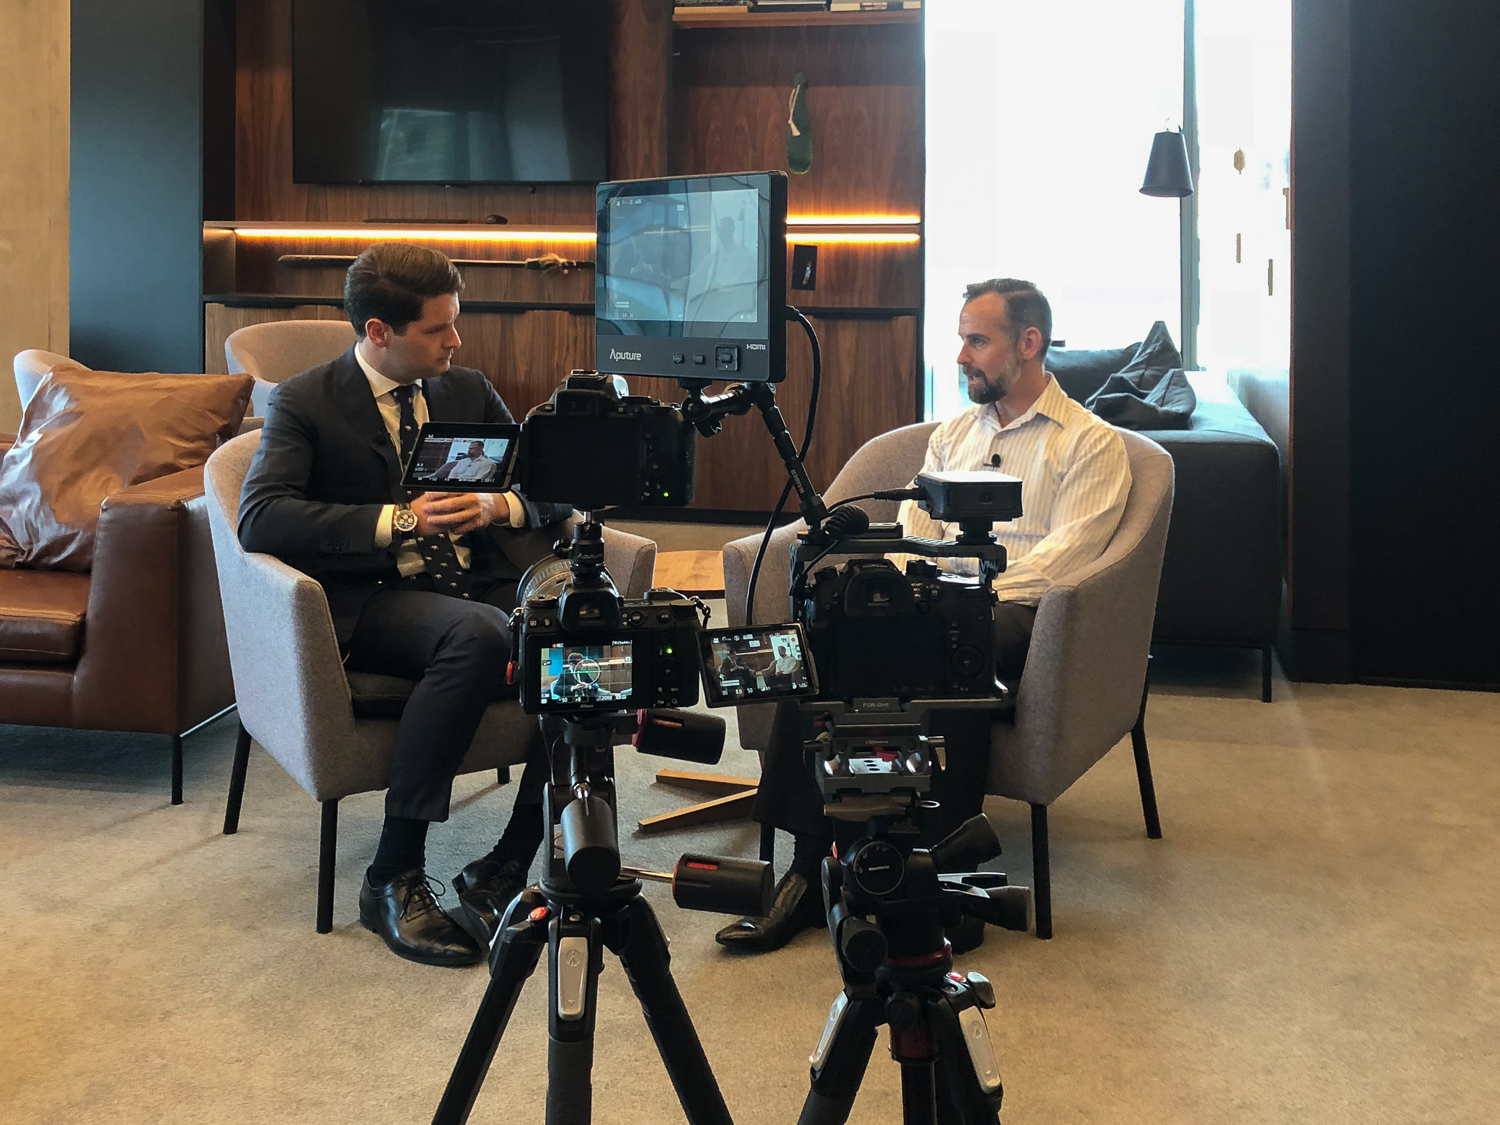
What Makes a Great Interview Video?
Interviews are integral to so many of the projects that I film - whether architectural, commercial or otherwise. For the majority of my films, a good interview piece acts as a foundation for the rest of the footage of each project - without it, there isn’t as much to explain to the viewer what it is that they are watching. Interviews should bridge the gap between a musical montage of clips and a short film that encapsulates and illustrates a project or idea. But what makes a great interview video?
Interviews are integral to so many of the projects that we film - corporate, commercial, architectural or otherwise.
For the majority of our films, a good interview piece acts as a foundation for the rest of the footage of each project - without it, there isn’t as much to explain to the viewer what it is that they are watching.
Interviews, for us, bridge the gap between a musical montage of clips and a short film that encapsulates and illustrates a project or idea.
But what makes a great interview video? The trick is to keep the content succinct and engaging, and not arduous to watch or repetitive.
1. Be Concise
This is the number one goal of all interview footage that we film. In order to build a successful and engaging video, we need to get all essential information across to the viewer in a manner that’s time-effective.
Videos don’t need to expand upon every single detail of a project; they just need to convey the key message. For the majority of the projects that we shoot, the final product will be displayed on a webpage alongside other content that helps to illustrate the topic of the video.
So, in most cases, you wont need to outline every last piece of information, but instead touch on the key points so that viewers can then go and find out more for themselves.
2. Be Relatable
You never want to come off as a robot, reading through a teleprompter with cold, lifeless eyes.
You need to be enthusiastic about your content - if you’re trying to build hype for a product then you need to be excited about sharing it with everyone. If you’re talking about a project that you’ve just completed, tell us what aspects of it you were most proud of, or most passionate about.
Showing genuine enthusiasm and being engaged will help you to appear more relatable to your audience and, in turn, increase engagement.
3. Relax!
Take a breather, grab a cup of coffee - whatever you need to feel comfortable and relaxed during your shoot. Anything that you can do to chill out during the shoot will yield better results in the end-product.
It’s just like doing any form of public speaking - being calm and confident is key to coming off as professional and knowledgable.
So have fun with it, and take your time. Remember, you can always do as many takes as you need with a video, so no pressure!
Keep each of these three tips in mind, and you’ll produce a great interview that’s engaging, professional, and easy to watch.
Got any other tips to add? Let us know in the comments below!

Life as an Architectural Photographer with Kerataconus
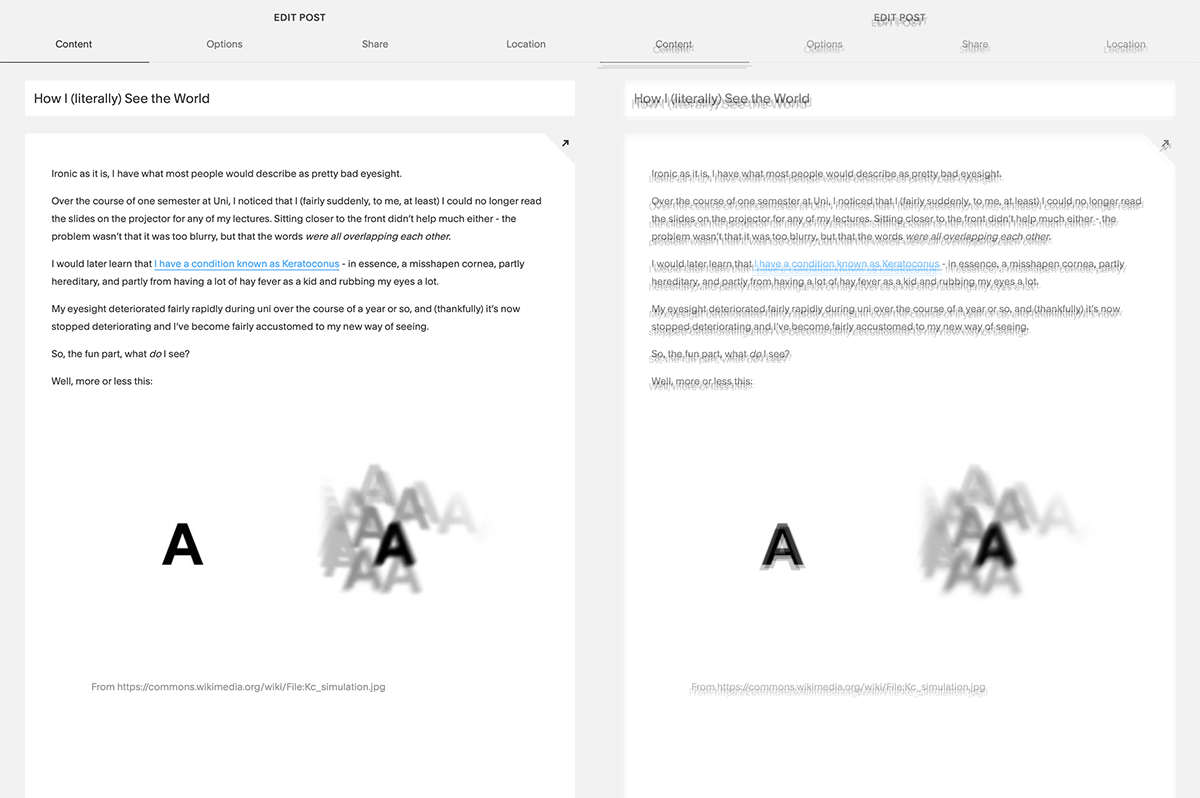
Ironic as it is, I have what most people would describe as pretty bad eyesight. Over the course of one semester at Uni, I noticed that I (fairly suddenly, to me, at least) I could no longer read the slides on the projector for any of my lectures. Sitting closer to the front didn’t help much either - the problem wasn’t that it was too blurry, but that the words were all overlapping each other. I would later learn that I have a condition known as Keratoconus - in essence, a misshapen cornea.
Ironic as it is, I have what most people would describe as pretty bad eyesight.
Over the course of one semester at Uni, I noticed that I (fairly suddenly, to me, at least) I could no longer read the slides on the projector for any of my lectures. Sitting closer to the front didn’t help much either - the problem wasn’t that it was too blurry, but that the words were all overlapping each other.
I would later learn that I have a condition known as Keratoconus - in essence, a misshapen cornea, partly hereditary, and partly from having a lot of hay fever as a kid and rubbing my eyes a lot.
My eyesight deteriorated fairly rapidly during uni over the course of a year or so, and (thankfully) it’s now stopped deteriorating and I’ve become fairly accustomed to my new way of seeing.
So, what do I see?
Well, more or less this:

From https://commons.wikimedia.org/wiki/File:Kc_simulation.jpg
It’s called ghosting, and it’s interesting to say the least. Obviously, it makes reading anything on a screen fairly difficult, or anything to do with lights and high contrast at all for that matter.
For example, here’s a more accurate visualisation of the ghosting effect for me using this very blog post:
Left: This blog post. Right: How this blog post looks to me.
But it’s not just for reading and writing that ghosting can be a bit of a nuisance - I see like this all of the time. Whats great is that I’ve become accustomed to the effect - I’ve dealt with it for almost 10 years now, but it’s still always there.
I can’t recognise faces at a distance, especially in the dark, or read any signs after a certain distance - but not because they’re too blurry - there are just too many of them overlapping each other. It’s too hard to single out the ‘right’ object when I’m looking at something from far away.
The great irony of this is that I actually have really great eyesight, technically speaking; I just see too many of the same thing.
So the next great question - why do photography?

I find it much easier to ‘see’ my images through the blocks of colour and shape.

Luckily, the finished products are always nice and crisp compared to what I see.
Funnily enough, to me it just makes sense. Of course, I’ve always enjoyed photography in general, but I didn’t get into photography in a serious way until just after my eyesight deteriorated so much.
I think for me the reason that I do photography is also the same reason that I shoot architecture and interiors - it’s making things tidy. It’s making sense out of the shapes and textures that are all over the place, like pulling apart a puzzle.
Fortunately for me, a lot of the art of architectural photography is about lining up compositions and creating simple, yet effective, images that emphasise shapes, form and textures.
I’m incredibly lucky that I’m able to adapt a craft that I enjoy so much into what I do for a living on a daily basis, and (luckily) I seem to have gotten used to the eyesight condition in it’s current state.
Fingers crossed, it doesn’t change much further from here, but I like to think that, these days, it gives me a bit of an edge in my work.
Just don’t be offended if I don’t recognise you at a distance!

Boost your interior design portfolio by working with a photographer
In the same way that you, the designer, take a space and realise its potential, interior photographers convert your designs into a succinct and timeless representation of your creativity and hard work. Good photography is key to showcasing your design work in your portfolio - it leaves an impression on potential clients, and helps to add to your professional ‘brand’.

In the same way that you, the designer, take a space and realise its potential, interior photographers convert your designs into a succinct and timeless representation of your creativity and hard work.
Good photography is key to showcasing your design work in your portfolio - it leaves an impression on potential clients, and helps to add to your professional ‘brand’.
Taking your own photos of your projects ‘in-house’ can yield great results, provided you have the right equipment and skills. However, we sometimes find that designers don’t always have the know-how to tackle tricky lighting, compositions and complete retouching to nail that perfect image.
In fact, when your photos don’t look great, or aren’t correctly framed and exposed, the photos can hinder your impression on viewers by looking ‘off’.
Ultimately, the images of your interior design projects are how the majority of people will see your work. Because of this, working with a photographer that creates consistent and well-composed images can be of huge benefit to your business.
Let’s dive in to the details:
Present your work in a way that lands top clients
Being an interior designer is similar to working as a photographer in the sense that it’s not your craft, but your marketing that comes first and foremost. Being the best interior designer out there won’t matter if nobody knows that you exist!
In order for clients to hire you, they have to first see what similar projects you’ve worked on in the past - usually by flicking through your website.
Presentation is key when it comes to marketing - you want to look professional and organised to potential clients - so it’s no surprise that the images you use need to look professional and consistent, too.
Imagine, from a client’s perspective, flicking through a designer’s website to find a gallery of crooked iPhone photos, arranged in no particular order, showcasing their latest project. They’d likely assume that the designer was rushed or disorganised, and the photos themselves would get in the way of the content within them.
Professional photographers help you to present your work in a vibrant and accurate manner. They embellish your own hard work by utilising high-end equipment, supplemented lighting and retouching to ‘craft’ a set of images that document your project.
How does this help you? It lets you present your work in a professional manner and convinces those higher-end clients that you’re organised, you pay attention to detail and you will give them the results that they’re looking for.


Bring in a fresh set of eyes
One huge benefit of working with an interior photographer is that they haven’t been involved with your design from day one.
Seeing a project for the first time, photographers will often find unique and interesting perspectives for images, or bring in fresh ideas and a bit of creativity that you and your team may not have considered.
Interior photography and interior design are two sides of the same coin, they rely on and complement each other, and photographers will often have a new approach to photographing the space.
The skill that many photographers learn is to convert a 3-dimensional space into a 2D image. Whilst a space may look great to the eye, the trick of photography is capturing the feel of that scene in a single image. Often, a range of lenses are used to compress or widen the space in a way that nails the ‘idea’ of the scene .
A photographers knowledge of perspective, composition and balance are essential factors in making your designs look eye-catching and inviting.


Save yourself time and money
Photography equipment is a huge investment. Whilst you can certainly get an entry-level DSLR for less than $1000, they’re going to struggle to yield the best images.
The cost of hiring an interior photography certainly isn’t cheap, but this cost covers a multitude of equipment (cameras, lights, stands, lenses, to name a few), as well as years of practice and hard work to be able to deliver consistent results.
What’s more is that if having a great set of photos ends up getting a new client to convert into a sale, then the photography is an investment that pays for itself.
On top of this, photographers save you time that you’d otherwise spend setting up the camera and shooting, through to editing the final images.
In most cases, you can show up for the photoshoot with your photographer, flick through some of the images, and the rest is taken care of by the photographer, leaving you with a full set of images that are ready to go. The time saved to let you focus on other areas of your work is definitely worth the investment of hiring a photographer.
build great business relationships
As I said earlier, the fields of interior design and photography go hand-in-hand, and one great aspect of working with a photographer is that you can build working relationships with someone in a similar industry, without the risk of competing against each other.
This is great for bouncing ideas off of one another and being able to drum up some more business - referrals are a two-way street between photographers dealing with a multitude of builders, homeowners and renovators, and designers having acquaintances looking for photographers.
It’s important in a field that’s often quite introverted, especially when starting out, to have some contacts that you can see on the regular and talk shop!
We’re a team of interior photographers based in Auckland, who live for awesome spaces and love what we do. Check out some of our work here. Have an upcoming project in need of some stunning photography? Get in touch!
Airbnb Photography 101 - Tips from an Airbnb Photographer
Looking to do some DIY Airbnb photos? You’ve come to the right place.
As an Airbnb Photographer in Wanaka, I’ve photographed hundreds of holiday rentals - both large and small, everything from designer mansions with swimming pools alongside the living rooms through to tiny homes and yurts!
Drawing on this experience, I’ve curated a list of key tips that should help you to get the absolute best photos of your own listing, for when a hiring a professional Airbnb photographer isn’t an option.
Did you know that Airbnb does provide professional photographers in some markets? You can apply for an Airbnb photographer on their website - just search for Airbnb Pro Photography to find out more.


These tips are designed to help regardless of what kind of camera you’re using - although having a DSLR is ideal, you’ll be able to get away with using your phone’s camera to get some great shots for your listing.
Now, before we dive in to the tips, keep in mind that above all else, you’re aiming for concise and bright, images that above all else sell the ‘vibe’ of staying at your place.
What does this mean? It means that you want to show visitors the absolute best that your place has to offer without bombarding them with photos, and you want to show them the best areas of the listing in order or importance.
With that in mind, here are my key tips:
1. Spring clean & declutter
Kind of obvious, but you’d honestly be surprised at how many holiday rentals I’ve turned up to where there’s laundry hanging out to dry or dirty dishes in the kitchen sink.
Do a deep clean - as if you’ve got guests coming - and declutter as much as possible. These photos will be (hopefully) used on your listing for a long time, so spend the time getting the place looking its’ absolute best.
Smooth the bed, put some towels out, tidy away any clutter (books, papers, magnets on the fridge, etc.), put some fresh flowers on the bedside table, and clean the windows. Get everything looking superb!

2. Shoot at the right time
If your listing has a fantastic patio with some lighting and a spa pool, why not shoot in the evening to accentuate the mood lighting?
Likewise, if your place gets amazing morning sun, shoot in the morning. Think about how your home changes throughout the day and try to photograph each room at the best time.

Evening lighting makes this outdoor space look really inviting to guests.

Think about which time of day the areas of your place look best during.
Time of day can hugely influence how your place looks in photos, and is one of the key things that I arrange when doing my own shoots of peoples’ homes.
On that same note, if you’ve got an overcast or rainy day, do hold off until you get a sunny clear day for the photos - it’ll be well worth the wait.
3. Plan your shot list
As a general rule, you’ll want to include 2-3 photos of each key area guests will have access to - this lets people get a better feel for a place than having just one shot of the bed or a front-on shot of the kitchen.
You can usually just pick three corners of each bedroom and go from there - two towards the bed, and one showing the view from the bed. Easy!


If you have a tripod, I do recommend using it for two reasons - you avoid camera shake from going handheld, and you’ve got a better bet at keeping the camera straight and level, which is a huge part of making a good interior photo.
By keeping the camera straight and level, you get minimal perspective distortion in your photos (which can make your room look like it’s caving in).
You can try this yourself - hold your phone at head height pointing into a room, and then try holding your camera at waist height and pointing it dead ahead at the room. Much better.
4. Staging
Some minor staging can do wonders for your photos, and really increase the production-value of your images.
These can be simple things like placing a bottle of wine on the dining table, or a bowl of fresh fruit. Get creative and add a bit of colour to the place.
Some more common items that I’ve run into are: chocolates on the coffee table, themed magazines and books, fresh flowers, cats (pets can be a great subject and are usually more than willing to lie on the bed!), and so on.
5. Shooting
Keeping the above point in mind, there are two main angles that you can use for each photo - looking into a room at an angle from a corner, or straight-on to a wall using a single-point perspective.
Try to use a combination of the two to get a nice blend of details shots and wide shots.

Single-point perspective is a go-to for good bedroom shots!

Angled shots show more space and complement the single-point shots well.
When shooting, turn on all of the lights in the space as a starting point - this adds brightness and more interest to the room.
If any bulbs or lamps are too distracting then feel free to turn these off, but as a general rule more lights make for better shots.
Next, line up your photo and make sure it’s well-exposed. What I mean by this is that the room looks as bright in-camera as it is in real life.
If you’re using a phone, tap on an area inside to tell the phone to expose for that part of the image. If you’re using a camera, consider using the exposure compensation button (or menu setting) to increase the exposure just a tad. Remember - we’re going for brighter images.
Shoot a range of shots for each area, plus some detail shots - things like the towels on the bed, or fresh flowers, or a close up of the kitchenette - small details that you’re proud of that your visitors will like to see.
6. Editing
Even if you don’t have access to expert-level editing software, there’s a huge range of available programs and apps for giving photos a quick touch-up.
If you’re using your phone to take the photos, chances are you’ll be able to use the phone’s built-in editing software to take care of it - otherwise consider using a program (like Preview on the Mac) which has tools to adjust colour and exposure.


Apple’s Preview tool has some powerful editing features built right in.
The key aspects that you’ll want to tweak are the exposure (overall level of brightness), the contrast, and the highlights. Bringing the exposure up just a tad will fill the image with a bit of light, which often looks more vibrant.
Pulling down the highlights slightly will increase the detail in the lighter areas of the image, and finally upping the contrast slightly will make the overall image a bit more punchy.
If the colours are in need of some touch-ups, consider slightly increasing the saturation and colour temperature - just be careful not to overdo it! A 10-20% increase will be plenty.
7. Uploading
Finally, you’re ready to show your photos to the world! How many photos, you ask?
Well, the key part here is to narrow down your image to a concise set that shows off all key features of your listing. Generally speaking, 12-15 images is ideal - any more than 20 and you risk having viewers lose interest.
Start with the most important shots - 2-4 images per bedroom, 2-3 of living areas and kitchens, some detail shots throughout, a few of the exterior of the building, outdoor spaces, and finally a few of the bathroom(s) and laundry/garage.
By going in order of importance, you’ve got a better bet of retaining your viewers’ interest. Have a play around with the ordering of the photos and when you’re ready, hit that upload button!
There we have it! Some handy tips to get the most out of your rental listing photography. Hopefully you’ve picked up some useful info here. How did your shots turn out? Let me know in the comments below!

How to Add Value by Using a Real Estate Photographer
All too often we look at properties on the market that are being marketed online using only a handful of photos - often taken on a phone, too dark, and too zoomed-in. Having photos - good photos - gives a huge boost to the potential success of a listing. It grabs peoples’ attention, makes each property look great, and ultimately brings in more competition, meaning a higher commission in the long run for you, the agent.

“You have two seconds to grab the buyer’s attention without a photo, and 20 seconds with a photo.”
- marketleader.com, "Back Away From the iPhone and Hire a Photographer"
All too often we look at properties on the market that are being marketed online using only a handful of photos - often taken on a phone, too dark, and too zoomed-in.
Having photos - good photos - gives a huge boost to the potential success of a listing. It grabs peoples’ attention, makes each property look great, and ultimately brings in more competition, meaning a higher commission in the long run for you, the agent.
How does it achieve this? Let’s dive in:
recap Time: what IS marketing?
Wiktionary defines it as “The promotion, distribution and selling of a product or service”.
In general, your goal is to make a property look as presentable as possible in order to maximise its’ value, which ultimately maximises the vendor’s sale price and the marketer’s commission.
Typically this will include your photography, floor plans, online listings, printed materials and signboards, as well as the in-person chats, open homes, and so on.
The goal of all of the above is to build awareness of the property, with a view to getting people to see the home and drive competition, which will in turn potentially raise the sale price.
Whats the single most important tool in this for showing people the property before they see it in person? Bingo.
With this in mind, let’s look at how having ‘basic’ photos of a property can affect the marketing.

Buyers spend 60% of their time looking at listing photos, and only 20% each on the listing description and agent description
- The Wall Street Journal
what do ‘DIY’ photos achieve?
In short, they represent a missed opportunity!
DIY real estate photos, whether on an iPhone or on a DSLR, will simply show the property ‘as-is’.
Shooting without professional equipment will often make the images appear darker, more distorted, and more cropped.
Why? Because photographers are able to light and compose each shot to compensate for dark areas, perspective distortion, and are able to use wide-angled lenses to include more of an area.
Take a look at these shots below:


The top two were shot on an iPhone 7+, with some editing for brightness. The bottom two shots were taken on a DSLR with lighting equipment and a wide-angle lens. See the difference in quality?
The DSLR images are crisper, brighter, have more accurate colours, show more of the room, and are generally more inviting. The iPhone images certainly show the space, but they’re not nearly as inviting.
So, what do DIY photos achieve? They document the place, and that’s about it. What they fall short of doing is making the property more presentable by combining lighting, composition and editing to make it look the best that it possibly can.
You wouldn’t draw the floor plan yourself, so why do the photos?

“Homes with professional photos get 61% more views.”
Redfin, "Look Sharp: Professional Listing Photos Sell For More Money"
so, How does professional photography add value for the agent and vendor?
It’s eye-catching. It stands out amongst the other properties in brochures, and it attracts people to click on the online listing.
Good professional photography complements and enhances a property, and aims to make the home look the best that it can.
The goal of real estate photography is not to just show the rooms; it’s to present the ‘vibe’ of a room using a perfect blend of equipment & techniques - lighting, framing, focal length and composition.
By maximising the interest and number of views that a home has, and ultimately bringing more potential buyers into the scene, the photos help to draw in more competition.
Competition is at the heart of every market, and will almost always yield the vendor (and agent) with a higher sale price..
“Professional photography can help sell your listing 39% closer to the original listing price.”
Is it worth it then?
Yes!
In most cases, hiring a photographer is one of the most crucial aspects of marketing the property, and provides a huge increase to the value of the home.
The increase in value more than covers the upfront cost of hiring most photographers, so this really seems like a no-brainer. The only question left is which photographer should you go with?

Creativity is Key - Some of Our Favourite Projects
We’re stoked that we get to work in a field that we’re passionate about. Whilst a lot of what we shoot isn’t always the most interesting to show to the world, we’ve certainly been lucky to work on some truly unique and awesome projects over the years.
We’ve learned that it’s incredibly important to keep pushing our limits when it comes to our technical skills, and equally as important to regularly shoot our own self-directed projects to keep the creative juices flowing.
Here are a couple of projects that stand out to us as some of the most fun, creative, and weird films that we’ve put together. Enjoy!
Buy my BMW
When the time came for me to part with my trusty BMW, we decided to go all-out on the marketing.
Cue one of the best motor vehicle advertisements ever made (in my opinion, at least).
Double Airpoints with Double Daniel
In 2016 I was approached by the marketing team at Bayleys to create a short internal video explaining their latest promotion to their agents.
The promotions was for double airpoints, so we figured we would kick this off by having two presenters, which eventually became the name of the project – Double Airpoints with Double Daniel.
The whole shoot was hilarious, and through some cool editing and filming tricks, we were able to put Daniel into the frame twice for the wide shots. Check it out below!
#SadFace
#SadFace is a tale of love and loss; an exploration of what it means to be human.
This short film is the result of a collaboration by Brendan Dalton and myself. The two of us have had a history of making short films ever since we were children, and to be honest while the production value has increased significantly on my end, the overall quality of scriptwriting remains about the same.
Anyway, enjoy!
Thomas’ Star Wars Wish
Thomas’ Wish was an action-packed, Star Wars themed wish with the awesome people at the Make-A-Wish Foundation. Thomas and his friends were taught in the ways of the force by a true Jedi master!
“Oh my gosh, we saw it last night, it is amazing!!!!! What a great job guys, you are awesome!!!” – Circus in a Flash
“This video is amazing! Such an incredible way to relive the magic of the day.” – Whoa! Studios
“OH MY GOD. That is just so cool. You’ve made me cry at my desk!” – Jane Traynor, Make-A-Wish volunteer

The DIY Home Staging Guide
So, the time has come for your home to feature in a photoshoot!
I’ve designed this guide for getting everything ready to go to ensure that your home looks as stunning as possible.
Following these simple steps to stage your home can add a huge amount of value to your photos, with the added bonus of leaving it spick and span (at least until the kids come home).
A little preparation for your shoot can go a long way.
Step one: de-clutter
In preparation for the shoot, tidy all surfaces up by removing any clutter (magazines, papers, knick- knacks). You don’t need to leave every surface spotless, but try and tuck away any unsightly collections of clutter.
For the bathrooms, make sure that you remove your shampoo and soap bottles from the shower, and take out your toothbrush. For the bedrooms, make sure that all laundry is put away and the beds are made and smoothed out.
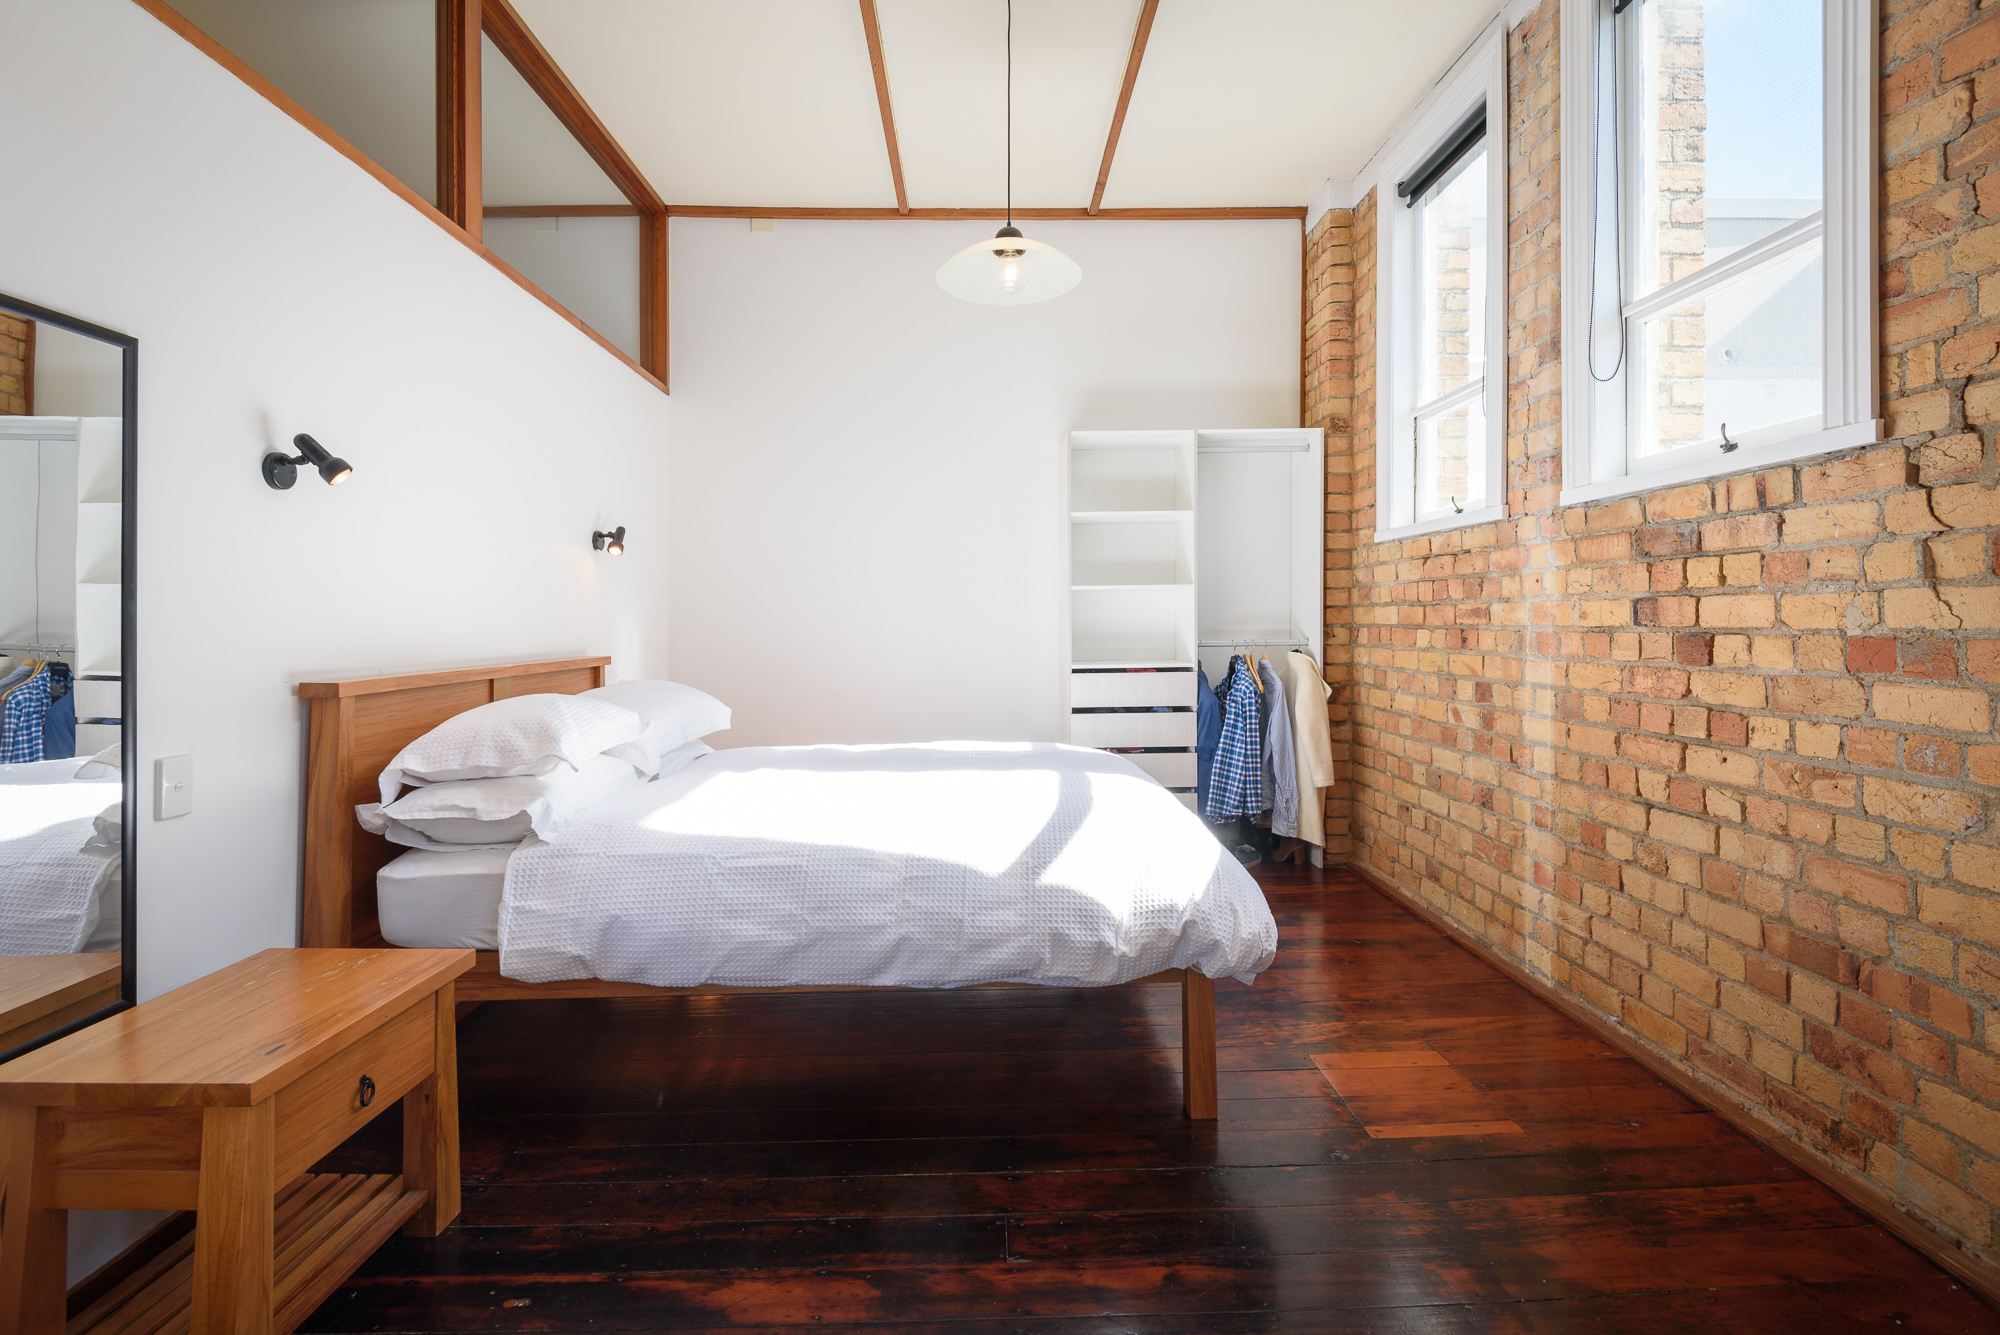
Having one or two items on display on desks and tables is ideal for photos - place an open book on the coffee table, or a bowl of fruit on the kitchen island - anything that adds a splash of colour to the scene.
It always pays to give bedrooms the hotel treatment, too - consider placing some folded towels on the corner of the beds, and make sure the pillows are sitting nicely, and so on.
Step two: de-personalise
These photos are going to show off your magnificent home to the world! But with that in mind, it pays to remove any personal items like family photos, drawings, and clothing, and leave just the essentials.

Step three: check your mirrors and showers
If you’re having your bathrooms photographed as a part of the shoot, have a quick look to make sure that there are no smudges on the mirrors, or anything like that. Along with this, try not to use the shower less than an hour before the shoot, as the water droplets will still be there in the photos. If you still need to, just give it a quick wipe down with a cloth afterwards.

Step Four: the odds and ends
In addition to the above points, here are a couple of other quick things to check:
Check that all lights inside are working, and replace any broken bulbs
If the garden/lawn is going to be featured, check that it doesn’t need mowing
If possible, hide your rubbish and recycling bins around the side of the house.

If you’ve got a 10/10 lawn, why not show it off?
And there we have it!
Hopefully this guide helps you to get the most out of your photoshoot.
Still have some questions about the do’s and don’t’s of home staging? Let us know in the comments below, or drop us a line.
Looking for some more staging inspiration?

Page to Screen - How to Plan a Video Project
So you need a video. You have the main idea all sorted, but what’s next? Once you’ve sorted your videographer, what’s the process for turning this idea into a finished product?
This guide should bring some clarity to what’s involved in the planning and creation of a video - all of the below steps are the same ones that our team runs through when taking on new video projects, and should help you to untangle some of the ideas that get bounced around in the early stages of planning!
Define your video goal
What’s the purpose of your video? Is it to promote a product, showcase your services as a business, or record an event taking place? Most of our video projects fall into one of these categories: people, product, service, or event.
Knowing what the purpose of your video is as a first step is crucial, as this can often dictate the form of the finished product.
Once you have this, decide whether you want to have a voiceover or presenter speaking throughout your video, or want to keep it minimal and use music and graphics to convey your message.
Take a look at this promo that we created for Bayleys - the goal of the video is to spread awareness about their regular workshop. The video is short, to keep interest levels up, and utilises a mix of footage from the workshop with a supporting voiceover from the instructor, as well as music and titles. The end product is informative, to the point, and meets the clients’ goal:
Location, location, location
Next thing to sort out is where the video will be set - do you want to showcase your latest installations at a residential property? Or have an interview of the new GM at a local cafe? Or is the video going to be in-studio with plan backdrops?
When deciding, have a think about what your location conveys to the viewer - an interview at a cafe will appear more relaxed and welcoming than an interview at a construction-site. Likewise, if the goal of your video is to bring in more commercial clients, showing them your latest residential projects may not be the best option.
Does the video suit a relaxed setting?
Or a more formal, corporate setting?
Set a Target video length
AKA, one of the hardest choices of every video project.
Length plays a huge part in video performance. The hard truth is that we, as creators, are always the most invested in our own videos, but, unfortunately, not everyone else may find them as interesting.
It’s important to keep videos as short as possible, and avoid any ‘filler’ parts, so that the video is engaging to as many viewers as possible.
For videos going on social media, or promos, the magic number is always around 30 seconds to 60 seconds long. Any more than this and you can risk having much lower viewer retention. 60 seconds may seem quite short, but think about those pesky YouTube ads that play before videos - most of those are skipped within 5 seconds!
Obviously if your video is an interview or a documentary, the length will be much longer than this - but for trying to grab peoples’ attention, consider creating a smaller video cut to send viewers through to the full video. This brings us to our next point:
Consider short cuts.
If you’ve got a lot of video content, it’s always possible to make new cuts that fit within the 30-60 second mark without leaving the full-length video behind closed doors.
Creating little social media ‘snippets’ is great for getting people interested without using the full-length video, just like the Bayleys promo earlier in this post.
Start Storyboarding!
Of course, we don’t necessarily mean sitting down and sketching out every single scene of your video - this doens’t make sense for an interview or a quick promo.
Planning your shots, in some form, is essential to making sure that you and your videographer are on the same page when it comes to the shoot day.
This can be a simple as jotting down a list of bullet points of how the video should play out, or doing a quick brainstorm of the beginning, middle, and end of the video.
Having a plan in place means that your videographer can break this down into a shot list - a list of every single clip to film for the video.
This saves a heap of time in post-production, as the storyboards will act as a guide for the editor. Planning is always key!
Sort The Additional Content
For the majority of videos these days, the footage is only a starting point - typically you’ll want a mix of supporting content (music, titles, and graphics) to embellish the footage to help maximise the impact of your video.
Your videographer will be able to guide you through the process of selecting suitable music and graphics, and typically will be able to source a range of options to consider during the editing phase.
The main thing to be aware of here is that depending on the usage of your video, you’ll encounter costs to licence any third-party content (music tracks being the obvious one).
This cost typically varies with intended video usage and audience - for example, the cost to use a track in a motion picture will be much higher than the cost to use a track in a YouTube video, and so on.
deliverables
Once your video is completed, it’s time to look at the nitty-gritty of video size and quality. Videos are typically filmed in a high quality and then rendered during the editing process to a suitable file type and size.
Currently, most videos are split between either 1080p resolution, or 4K.
4K is the current ‘trendy’, ‘premium’ and high-quality resolution, but the huge detail comes at a cost of needing a massive file size.
Beware of having a large file size for your video if you’re going to be using it online - quality doesn’t mean much if people need to buffer for a long time to see it.
1080p, on the other hand, is a great go-to resolution. It’s able to be streamed smoothly on most modern connections and provides good detail.
Have a chat with your videographer about what you’ll be using the video for and they’ll be able to recommend a file type for the best mix of quality and size!
Hopefully this guide has shed some light on the process of working with a videographer! Still have questions? Let us know in the comments below.
Have an idea for a video and want to see it come to life? Get in touch!