
Articles & Updates
Check back here for updates and new articles from time to time. Looking for examples of my work? Hop on over to one of my portfolio pages:
Airbnb Photography 101 - Tips from an Airbnb Photographer
Looking to do some DIY Airbnb photos? You’ve come to the right place.
As an Airbnb Photographer in Wanaka, I’ve photographed hundreds of holiday rentals - both large and small, everything from designer mansions with swimming pools alongside the living rooms through to tiny homes and yurts!
Drawing on this experience, I’ve curated a list of key tips that should help you to get the absolute best photos of your own listing, for when a hiring a professional Airbnb photographer isn’t an option.
Did you know that Airbnb does provide professional photographers in some markets? You can apply for an Airbnb photographer on their website - just search for Airbnb Pro Photography to find out more.


These tips are designed to help regardless of what kind of camera you’re using - although having a DSLR is ideal, you’ll be able to get away with using your phone’s camera to get some great shots for your listing.
Now, before we dive in to the tips, keep in mind that above all else, you’re aiming for concise and bright, images that above all else sell the ‘vibe’ of staying at your place.
What does this mean? It means that you want to show visitors the absolute best that your place has to offer without bombarding them with photos, and you want to show them the best areas of the listing in order or importance.
With that in mind, here are my key tips:
1. Spring clean & declutter
Kind of obvious, but you’d honestly be surprised at how many holiday rentals I’ve turned up to where there’s laundry hanging out to dry or dirty dishes in the kitchen sink.
Do a deep clean - as if you’ve got guests coming - and declutter as much as possible. These photos will be (hopefully) used on your listing for a long time, so spend the time getting the place looking its’ absolute best.
Smooth the bed, put some towels out, tidy away any clutter (books, papers, magnets on the fridge, etc.), put some fresh flowers on the bedside table, and clean the windows. Get everything looking superb!

2. Shoot at the right time
If your listing has a fantastic patio with some lighting and a spa pool, why not shoot in the evening to accentuate the mood lighting?
Likewise, if your place gets amazing morning sun, shoot in the morning. Think about how your home changes throughout the day and try to photograph each room at the best time.

Evening lighting makes this outdoor space look really inviting to guests.

Think about which time of day the areas of your place look best during.
Time of day can hugely influence how your place looks in photos, and is one of the key things that I arrange when doing my own shoots of peoples’ homes.
On that same note, if you’ve got an overcast or rainy day, do hold off until you get a sunny clear day for the photos - it’ll be well worth the wait.
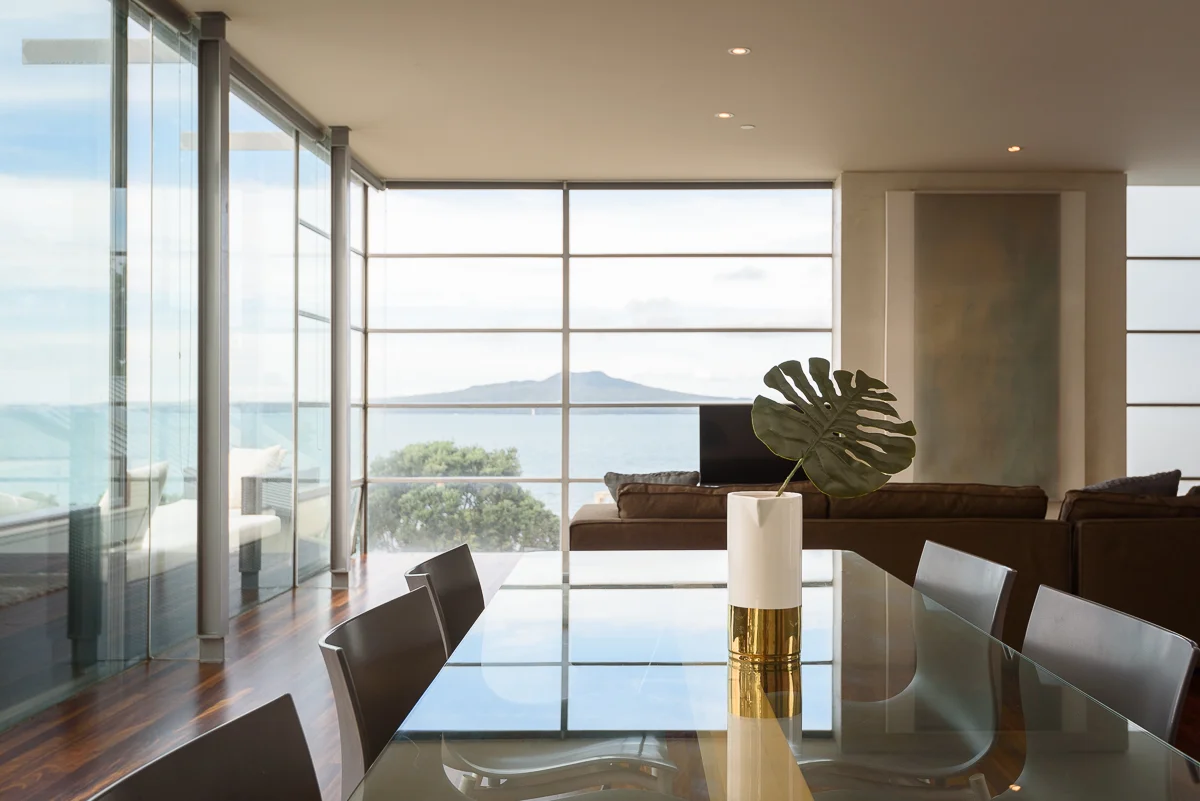
3. Plan your shot list
As a general rule, you’ll want to include 2-3 photos of each key area guests will have access to - this lets people get a better feel for a place than having just one shot of the bed or a front-on shot of the kitchen.
You can usually just pick three corners of each bedroom and go from there - two towards the bed, and one showing the view from the bed. Easy!


If you have a tripod, I do recommend using it for two reasons - you avoid camera shake from going handheld, and you’ve got a better bet at keeping the camera straight and level, which is a huge part of making a good interior photo.
By keeping the camera straight and level, you get minimal perspective distortion in your photos (which can make your room look like it’s caving in).
You can try this yourself - hold your phone at head height pointing into a room, and then try holding your camera at waist height and pointing it dead ahead at the room. Much better.
4. Staging
Some minor staging can do wonders for your photos, and really increase the production-value of your images.
These can be simple things like placing a bottle of wine on the dining table, or a bowl of fresh fruit. Get creative and add a bit of colour to the place.
Some more common items that I’ve run into are: chocolates on the coffee table, themed magazines and books, fresh flowers, cats (pets can be a great subject and are usually more than willing to lie on the bed!), and so on.
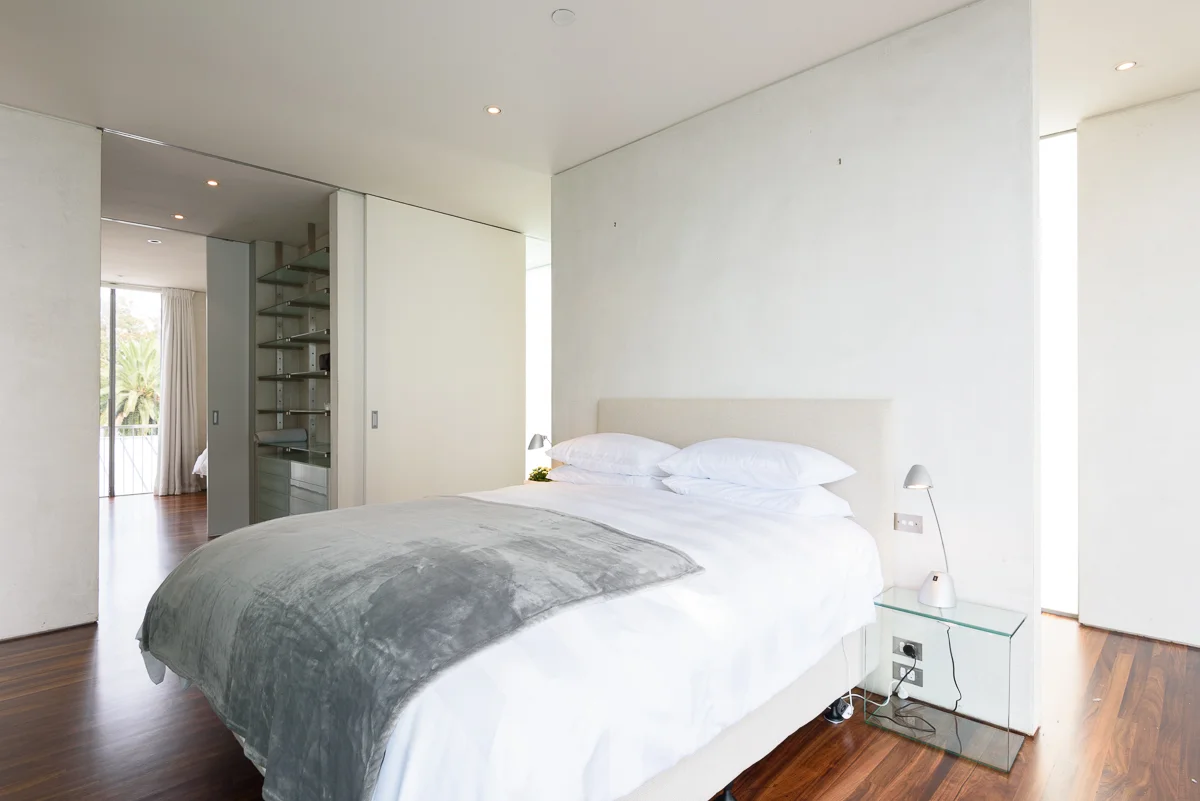
5. Shooting
Keeping the above point in mind, there are two main angles that you can use for each photo - looking into a room at an angle from a corner, or straight-on to a wall using a single-point perspective.
Try to use a combination of the two to get a nice blend of details shots and wide shots.

Single-point perspective is a go-to for good bedroom shots!

Angled shots show more space and complement the single-point shots well.
When shooting, turn on all of the lights in the space as a starting point - this adds brightness and more interest to the room.
If any bulbs or lamps are too distracting then feel free to turn these off, but as a general rule more lights make for better shots.
Next, line up your photo and make sure it’s well-exposed. What I mean by this is that the room looks as bright in-camera as it is in real life.
If you’re using a phone, tap on an area inside to tell the phone to expose for that part of the image. If you’re using a camera, consider using the exposure compensation button (or menu setting) to increase the exposure just a tad. Remember - we’re going for brighter images.
Shoot a range of shots for each area, plus some detail shots - things like the towels on the bed, or fresh flowers, or a close up of the kitchenette - small details that you’re proud of that your visitors will like to see.
6. Editing
Even if you don’t have access to expert-level editing software, there’s a huge range of available programs and apps for giving photos a quick touch-up.
If you’re using your phone to take the photos, chances are you’ll be able to use the phone’s built-in editing software to take care of it - otherwise consider using a program (like Preview on the Mac) which has tools to adjust colour and exposure.


Apple’s Preview tool has some powerful editing features built right in.
The key aspects that you’ll want to tweak are the exposure (overall level of brightness), the contrast, and the highlights. Bringing the exposure up just a tad will fill the image with a bit of light, which often looks more vibrant.
Pulling down the highlights slightly will increase the detail in the lighter areas of the image, and finally upping the contrast slightly will make the overall image a bit more punchy.
If the colours are in need of some touch-ups, consider slightly increasing the saturation and colour temperature - just be careful not to overdo it! A 10-20% increase will be plenty.
7. Uploading
Finally, you’re ready to show your photos to the world! How many photos, you ask?
Well, the key part here is to narrow down your image to a concise set that shows off all key features of your listing. Generally speaking, 12-15 images is ideal - any more than 20 and you risk having viewers lose interest.
Start with the most important shots - 2-4 images per bedroom, 2-3 of living areas and kitchens, some detail shots throughout, a few of the exterior of the building, outdoor spaces, and finally a few of the bathroom(s) and laundry/garage.
By going in order of importance, you’ve got a better bet of retaining your viewers’ interest. Have a play around with the ordering of the photos and when you’re ready, hit that upload button!
There we have it! Some handy tips to get the most out of your rental listing photography. Hopefully you’ve picked up some useful info here. How did your shots turn out? Let me know in the comments below!

How to Add Value by Using a Real Estate Photographer
All too often we look at properties on the market that are being marketed online using only a handful of photos - often taken on a phone, too dark, and too zoomed-in. Having photos - good photos - gives a huge boost to the potential success of a listing. It grabs peoples’ attention, makes each property look great, and ultimately brings in more competition, meaning a higher commission in the long run for you, the agent.

“You have two seconds to grab the buyer’s attention without a photo, and 20 seconds with a photo.”
- marketleader.com, "Back Away From the iPhone and Hire a Photographer"
All too often we look at properties on the market that are being marketed online using only a handful of photos - often taken on a phone, too dark, and too zoomed-in.
Having photos - good photos - gives a huge boost to the potential success of a listing. It grabs peoples’ attention, makes each property look great, and ultimately brings in more competition, meaning a higher commission in the long run for you, the agent.
How does it achieve this? Let’s dive in:
recap Time: what IS marketing?
Wiktionary defines it as “The promotion, distribution and selling of a product or service”.
In general, your goal is to make a property look as presentable as possible in order to maximise its’ value, which ultimately maximises the vendor’s sale price and the marketer’s commission.
Typically this will include your photography, floor plans, online listings, printed materials and signboards, as well as the in-person chats, open homes, and so on.
The goal of all of the above is to build awareness of the property, with a view to getting people to see the home and drive competition, which will in turn potentially raise the sale price.
Whats the single most important tool in this for showing people the property before they see it in person? Bingo.
With this in mind, let’s look at how having ‘basic’ photos of a property can affect the marketing.

Buyers spend 60% of their time looking at listing photos, and only 20% each on the listing description and agent description
- The Wall Street Journal
what do ‘DIY’ photos achieve?
In short, they represent a missed opportunity!
DIY real estate photos, whether on an iPhone or on a DSLR, will simply show the property ‘as-is’.
Shooting without professional equipment will often make the images appear darker, more distorted, and more cropped.
Why? Because photographers are able to light and compose each shot to compensate for dark areas, perspective distortion, and are able to use wide-angled lenses to include more of an area.
Take a look at these shots below:


The top two were shot on an iPhone 7+, with some editing for brightness. The bottom two shots were taken on a DSLR with lighting equipment and a wide-angle lens. See the difference in quality?
The DSLR images are crisper, brighter, have more accurate colours, show more of the room, and are generally more inviting. The iPhone images certainly show the space, but they’re not nearly as inviting.
So, what do DIY photos achieve? They document the place, and that’s about it. What they fall short of doing is making the property more presentable by combining lighting, composition and editing to make it look the best that it possibly can.
You wouldn’t draw the floor plan yourself, so why do the photos?

“Homes with professional photos get 61% more views.”
Redfin, "Look Sharp: Professional Listing Photos Sell For More Money"
so, How does professional photography add value for the agent and vendor?
It’s eye-catching. It stands out amongst the other properties in brochures, and it attracts people to click on the online listing.
Good professional photography complements and enhances a property, and aims to make the home look the best that it can.
The goal of real estate photography is not to just show the rooms; it’s to present the ‘vibe’ of a room using a perfect blend of equipment & techniques - lighting, framing, focal length and composition.
By maximising the interest and number of views that a home has, and ultimately bringing more potential buyers into the scene, the photos help to draw in more competition.
Competition is at the heart of every market, and will almost always yield the vendor (and agent) with a higher sale price..
“Professional photography can help sell your listing 39% closer to the original listing price.”
Is it worth it then?
Yes!
In most cases, hiring a photographer is one of the most crucial aspects of marketing the property, and provides a huge increase to the value of the home.
The increase in value more than covers the upfront cost of hiring most photographers, so this really seems like a no-brainer. The only question left is which photographer should you go with?